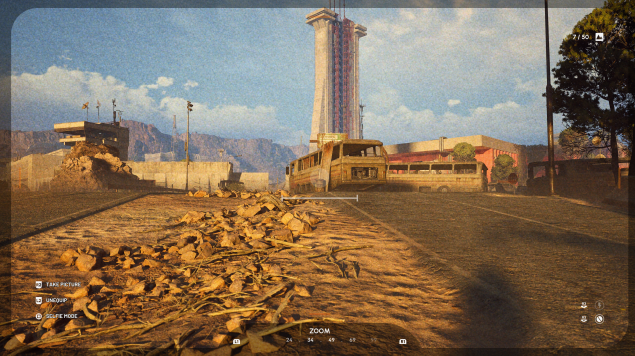

The When Everything Falls quest sends Raiders across Spaceport to document the route where mutineers once hid weapons. Shani, Speranza’s head of security, assigns the mission after geotagged coordinates linked to encrypted radios point toward the facility. Your job is to photograph a series of landmarks, from a roadside security booth to the top of the Launch Towers.
This is a reconnaissance mission, so the focus is on reaching each location and recording it with a camera. Bring a Basic Camera in your safe pocket before deploying. The route begins at the Water Towers in the northwest and continues through the Arrival Building before reaching the towers. Use the objective log to confirm each photograph as you go.
Quest route at a glance
| Order | Location | Photo target |
|---|---|---|
| 1 | Road near the Water Towers | Security booth |
| 2 | Along the route beyond the booth | One reinforced bus |
| 3 | East of the bus area | Breach in the perimeter wall |
| 4 | Arrival Building, northwest security room | Room interior |
| 5 | Outside the building’s western front doors | Port A of the Launch Towers |
| 6 | Midway up the Launch Towers | Control room |
| 7 | Highest point of the Launch Towers | Main launch platform |
Prepare before deploying
The Basic Camera is essential. Put it in your safe pocket before leaving Speranza so it is available when the photography objectives begin. Keep it easy to access during the expedition; you’ll use it at several locations, and confirming each shot before moving on can save you from backtracking.
Pack a loadout suited to travel, the locked security room, and the tower climb. You do not need to defeat every ARC machine in the area, but you should be ready to handle enemies that block your path.
Consider bringing:
- A weapon and suitable ammunition for encounters along the route.
- Hullcracker ammo, which the quest information recommends for armored ARC units or structural obstacles.
- Recovery supplies for the trip through Spaceport.
- Adrenaline shots and other useful consumables, depending on your preferred loadout.
Keep your equipment practical. The camera is the mission requirement; the rest of your gear should support your route and your ability to respond to threats. A focused loadout also leaves inventory space for items you find during the expedition.
Spaceport photo route
1. Begin at the Water Towers
Travel to the Water Towers in the northwestern sector of Spaceport. Reaching this point of interest starts the reconnaissance route and updates the objective log.
Take a moment to orient yourself before moving away from the towers. The next target is a small security booth just down the road. Following the landmarks in order makes the route easier to track and helps keep the mission focused on its photography objectives.
2. Photograph the security booth
Continue down the nearby road until you reach the small security booth. Position yourself so the structure is clearly visible in the camera frame, then take the photograph.
Check the objective log before leaving. If the task has not updated, adjust your position to get a clearer view and take another picture. Once the booth is recorded, continue along the path toward a cluster of barricaded buses.
3. Photograph a reinforced bus
The next target is a group of reinforced buses. You only need to photograph one bus, so choose the one that is easiest to see from your current position. Make sure it is unobstructed in the frame and take the shot.
After the log confirms the photograph, look east from the bus area. The next clue is a visible opening in the perimeter wall. Using the buses as your reference point can help you identify the direction of travel without wandering away from the mission route.
4. Record the breach in the perimeter wall
Face east and locate the damaged section of the perimeter wall. Move to a position where the breach is easy to see, then photograph it. Confirm the objective has registered before heading north.
This image completes the opening stretch of the route. The mission now leads deeper into the facility, toward the Arrival Building. As you leave the wall area, keep your objective log available so you can track the change in the next required target.
5. Photograph the Arrival Building security room
The Arrival Building is north of the perimeter-wall objective. The security room is on the northwestern side of the structure. Its door is typically locked and requires breaching, so approach prepared to deal with any nearby threats.
After entering the room, take a clear photograph of the interior. Check the log to verify that the image counted. This is a useful place to pause briefly and confirm progress before leaving the building; otherwise, you may have to return to the room if the objective did not register.
6. Photograph Port A from outside
Exit through the Arrival Building’s western front doors. From outside, look toward Port A of the Launch Towers. The building provides a vantage point from which you can photograph the port before crossing the open courtyard.
Aim the camera so Port A is clearly visible and take the picture. Wait for the objective log to update, then continue toward the towers. This step links the Arrival Building portion of the route with the climb ahead, so confirming the photograph helps keep the remaining objectives clear.
7. Reach the Launch Towers control room
Enter the base of the Launch Towers and look toward the back of the structure for ladders and vertical ziplines. These provide the route upward. Climb carefully and manage your stamina as you move between sections.
The area may contain ARC machines, including Ticks, Fireballs, and Rocketeers. Watch your surroundings as you progress and deal with enemies that interfere with your route. You can stay focused on the mission objectives rather than searching for every machine in the area.
Midway up the structure, locate the Launch Towers control room and photograph it. Make sure the room is visible in the frame, then check the objective log before climbing higher. Confirming this step means you can focus on reaching the platform above.
8. Photograph the main launch platform
Continue to the highest point of the Launch Towers. The main launch platform is the last photo target. Find a position with a clear view of the open platform, take the photograph, and check that the objective log records it.
With all the required images complete, make your way back to Speranza and report to Shani. The mission is not turned in just because the photographs are finished; returning to the hub and speaking with her is how you claim the rewards.
Tips for a smoother expedition
- Confirm every photograph. Check the objective log before leaving each landmark, especially the Arrival Building room and the Launch Towers control room.
- Keep the route in sequence. The booth, buses, wall breach, Arrival Building, and towers form a straightforward chain of objectives.
- Choose clear camera angles. If a picture does not register, adjust your position to give the target an unobstructed view.
- Use the western exit for Port A. The view from outside the Arrival Building’s western front doors lets you photograph the port before moving into the tower area.
- Save supplies for the climb. The route upward uses ladders and vertical ziplines, and ARC machines may be present.
- Plan the return to Speranza. Once the platform is photographed, leave enough time and supplies to return and report to Shani.
Choosing ARC Raiders Items for the quest
When selecting ARC Raiders Items for this mission, prioritize equipment that supports photography, travel, and encounters along the route. The Basic Camera is required, while ammunition and recovery supplies should match your preferred weapon and playstyle.
Players considering cheap ARC Raiders Items can build a practical loadout around those same needs. Focus on mission-relevant equipment rather than carrying gear for activities unrelated to this expedition. A well-planned kit helps you keep the camera accessible, manage the tower climb, and preserve supplies for the journey back.
When Everything Falls rewards
Report to Shani in Speranza after completing the reconnaissance route to receive:
- 5,000 experience points
- One Stiletto weapon
- 100 rounds of light ammunition
- Adrenaline shots
- A weapon silencer
These rewards provide experience and equipment for future expeditions. Check your inventory after speaking with Shani so you can see what is ready for your next deployment.
The quest follows a clear progression from the Water Towers to the top of the Launch Towers. Carry the Basic Camera in your safe pocket, photograph each landmark in order, and verify the objective log before moving on. A prepared loadout and steady pace make it easier to complete the reconnaissance and return to Speranza with the mission ready to turn in.